Abstract: ELISA(enzyme-linked immunosorbent assay) indirectly shows the existence or amount of detected antigen or antibody via enzyme-substrate staining reaction. The assay principle is based on fixing a certain concentration of antigen or antibody on the surface of polystyrene microplate via physical adsorption. ELISA is one of the immuno-labelling techniques ( including immunofluorescence technique, immunoradiometric technique, immunoenzymatic technique, and immune colloidal gold technique etc.). It's widely applied in scientific research and clinical assay, and also has the rapid, qualitative or quantitative feature.
Keywords: ELISA Assay, Biochemistry Assay, Immunologic Tests, Immunoassay, Immunology
1. ELISA Coating Principle
During the assay, antigen or capture antibody should be coated on the solid phase carrier. Molecular detection for enzyme or fluorescent group performs the quantitative analysis for the target protein via chemical-electrical signal transduction.
There are many solid phase carriers. The commonly used polystyrene has higher protein adsorption and can be processed in various forms without involving in chemical reaction. Besides plastic products, another two materials for solid phase carrier are: a. microporous filter; b. magnetic particle containing iron.
The successful ELISA assay depends on the quality of antigen and antibody. Three kinds of ELISA antigens include natural antigen, recombinant antigen and synthetic peptide antigen. Natural antigens are harvested by animal tissue, body fluid or microbial culture and usually contain various antigen components required for purification. Recombinant and synthetic peptide antigen are manually synthesized and featured in safety use, high purity and less interference. However, the production difficulty and cost are very high.
Coating refers to the immobilization process of antigen or antibody. Coating method depends on carriers. E.g. for polystyrene ELISA plate, antigen or antibody should be dissolved in buffer and stored at 4℃ overnight after adding into ELISA wells. If the protein concentration in the coating solution is very low, the surface of solid phase carrier can be completely covered by the protein. The added serum sample and protein in enzyme conjugate are partially adsorbed on the surface of solid phase carrier. Finally, the non-specific staining results in the high background value. In this situation, other solutions should be used to coat again to remove interference. This process is called blocking.
2. ELISA Assay Design
It's suggested to set the first two columns of the plate for standard spotting. Also set eight gradient concentration and two columns of duplicated wells. Add the standard working solution into relevant well in ascending concentration.
Set the last ten columns for sample spotting. Usually, set 2-3 duplicated wells. According to assay requirements, set normal group, model group and treatment group etc. Sample dilution and concentration depend on detected targets.
3. ELISA Assay Procedure
3.1. Regents Reparation
Take ELISA kit out of the fridge 20min earlier and equilibrate to room temperature(18-25℃). For repeated use, take required strips and standard. Store rest strips and standard in the specified condition.
3.2. Wash Buffer
Dilute 30ml concentrated wash buffer(15ml for 48T) to 750ml(375ml for 48T) with deionized or distilled water(18MΩ ultrapure water recommended). Alternatively, dilute proper concentrated wash in 25 times and mix well. Store the rest solution at 2-8℃.
Crystals found in concentrated wash buffer should be heated by water-bath at 40℃. Heating temperature should be lower than 50℃. After complete crystal dissolution, mix well and then use.
Prepared buffer should be used in the same day. The rest can be stored at 2-8℃ within 48h.
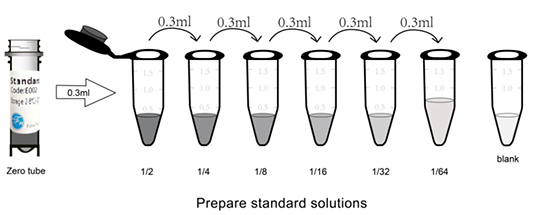
3.3. Standard
Centrifuge lyophilized standard at 10000×g for 1min.
Preparation of 300pg/ml stadium standard(labeled as zero tube): add 1ml sample dilution buffer into standard tube. Tighten the tube and let it stand for 2min at room temperature. Gently shake several times and mix well(Or add 1ml sample dilution buffer and let it stand for 1-2min. Mix for 3-5 seconds with low-speed vortex mixer).
Double Dilution: label 7 EP tubes as 1/2, 1/4, 1/8, 1/16, 1/32, 1/64 and blank respectively. Add 0.3ml sample dilution buffer into each EP tube. Then, add 0.3ml standard solution(zero tube) into 1/2 tube and mix well. Transfer 0.3ml from 1/2 tube into 1/4 tube and mix them thoroughly. Transfer 0.3ml from 1/4 tube into 1/8 tube and mix them thoroughly.......and so on. The Blank EP tube only contains sample dilution buffer. Now, the concentration of the standard in the seven EP tubes are 150pg/ml, 75pg/ml, 37.5pg/ml, 18.75pg/ml, 9.375pg/ml, 4.688pg/ml, 0pg/ml respectively.
Notes: Each dilution requires for 3ul buffer at least and complete mixing. Dilution rate is no more than 100. Store dissolved standard(zero tube) at 2-8℃ and use within 12h. Diluted standard working solution in other gradient should be used within 2h.
3.4. Biotin-labeled Antibody Working Solution
The working solution should be prepared within 20min before the assay and can't be stored for a long time.
Calculate required total volume of the working solution: 100ul/well x quantity of wells. (It's better to prepare additional 100ul-200ul.)
Centrifuge for 1min at 1000xg in low speed and bring down the concentrated biotin-labeled antibody to the bottom of tube.
Dilute the biotinylated detection antibody with antibody dilution buffer at 1:99 and mix them thoro ughly.
(e.g. Add 10ul concentrated biotin-labeled antibody into 990ul antibody dilution buffer.)
3.5. Preparation of HRP-Streptavidin Conjugate (SABC) Working Solution
The working solution should be prepared within 20min before the assay and can't be stored for a long time.
Calculate required total volume of the working solution: 100ul/well x quantity of wells. (It's better to prepare additional 100ul-200ul.)
Centrifuge for 1min at 1000xg in low speed and bring down the concentrated SABC to the bottom of tube.
Dilute the concentrated SABC with SABC dilution buffer at 1:99 and mix them thoroughly. (e.g. Add 10ul concentrated SABC into 990ul SABC dilution buffer.)
4. Detailed Assay Steps
1. Set standard, pilot samples, control (blank) wells respectively, and then record their positions. It's recommended to measure each standard and sample in duplicate to decrease experimental errors.
2. Standards and samples loading: Aliquot 100ul into each gradient of standard well. Then, add 100ul pilot samples into each sample well. Also add 100ul sample dilution buffer into the control (blank) well. Seal the plate and incubate for 90 minutes at 37℃. (Add the solution to the bottom of each well. Mix gently without touching the sidewall and foaming.)
3. Standards and samples loading: Aliquot 100ul into each gradient of standard well. Then, add 100ul pilot samples into each sample well. Also add 100ul sample dilution buffer into the control (blank) well. Seal the plate and incubate for 90 minutes at 37℃. (Add the solution to the bottom of each well. Mix gently without touching the sidewall and foaming.)
4. Biotin-labeled Antibody: Add 100ul biotin-labeled antibody working solution into each well. Seal the plate and incubate for 60 minutes at 37℃.
5. Wash three times: Remove the cover, then absorb the liquid in the plate or tap the plate on a clean absorbent paper two or three times. Add 350ul wash buffer into each well and immerse for 1min. Discard the liquid in the well and tap on the absorbent paper again. Repeat the washing step three times.
6. HRP-Streptavidin Conjugate (SABC): Add 100ul SABC working solution into each well. Seal the plate and incubate for 30 minutes at 37℃. (Put the whole bottle of TMB into the 37℃ incubator to equilibrate for 30min.)
7. Wash five times: Remove the cover, and then wash the plate with wash buffer five times. Read washing method in step 5.
8. TMB Substrate: Add 90ul TMB Substrate into each well, seal the plate and incubate at 37℃ in dark within 10-20 minutes. Run the microplate reader and preheat for 15min. (Notes: The reaction time can be shortened or extended according to the actual color change, but not more than 30 minutes. You can terminate the reaction when apparent gradient appeared in standard wells. Weaker or stronger color intensity is unacceptable. )
9. Stop: Keep the liquid in the well after staining. Add 50ul stop solution into each well. The color will turn yellow immediately. The order for adding stop solution and TMB substrate solution is the same.
10. OD Measurement: Read the O.D. absorbance at 450nm in a microplate reader immediately and calculate.
5. Notes for Using ELISA Kits
1. Labeling is required to avoid mixture of components when using different ELISA kits.
2. After opening the kit, please refer to components storage conditions for ELISA plate and standard(The activity will decrease once getting damped). The component defect caused by mistakenly usage or storage can be purchased again. Other components can be stored at 2-8℃.
3. Offered reagents volume is a little more than the labeled volume. Sterilized disposable tips are required. Tighten the reagent bottle to avoid microbial contamination and evaporation.
4. During manual washing, tips or dropper for adding wash buffer shouldn’t touch the plate well. Insufficient washing or contamination easily cause false positive and high background.
5. During the assay, prepare reagents required for next step. Add reagents into wells quickly after washing, to avoid dryness of wells and failed assay.
6. Don't use reagents from other batches or sources without confirmation.
7. Don't repeatedly use disposable tips to avoid cross-contamination.
8. After sample loading, seal the plate to avoid sample evaporation during incubation. Complete the incubation process at the recommended temperature.
9. During the assay, please protect yourself via wearing white gown, mask, gloves. Please follow “general biosafety standard for microbiological and biomedical laboratories” for detecting blood or other body fluid sample.
Assay steps of different ELISA kits are not almost the same. The assay duration also varies. Please carefully read manuals and arrange time properly. Finally, complete data analysis.
REFERENCES
[1]A short history, principles, and types of ELISA, and our laboratory experience with peptide/protein analyses using ELISA, PMID: 25908411.
[2]DNA-Protein-Interaction (DPI)-ELISA Assay for PPAR-γ Receptor Binding, PMID: 36152182.